This page will help you create and publish new documentation using HySDS wiki templates and the style guide.
Page Navigation: | ||||||
|---|---|---|---|---|---|---|
|
|
|---|
Recommendation
| Tip |
|---|
This quick start guide is intended to help users generate documentation more efficiently. It is recommended that users open a new browser tab and create their documentation in tandem while progressing though the steps outlined on this page. |
Step 1: Understand Your Audience
Ask yourself how knowledgeable your target audience is. This information will help you select the best template.
Can they formulate specific questions about the topic? If not, then they’re a true beginner: Tutorial
Can they ask specific questions? If yes, they’re an infrequent or new user: Step-by-Step Guides
Are they are regular user that needs targeted information? If so, use: Cheat Sheets (Reference)
Are they a regular user looking for context or background information? Post in: Stack Overflow
For additional guidance on how to style your document’s content, see the Contribution Guide.
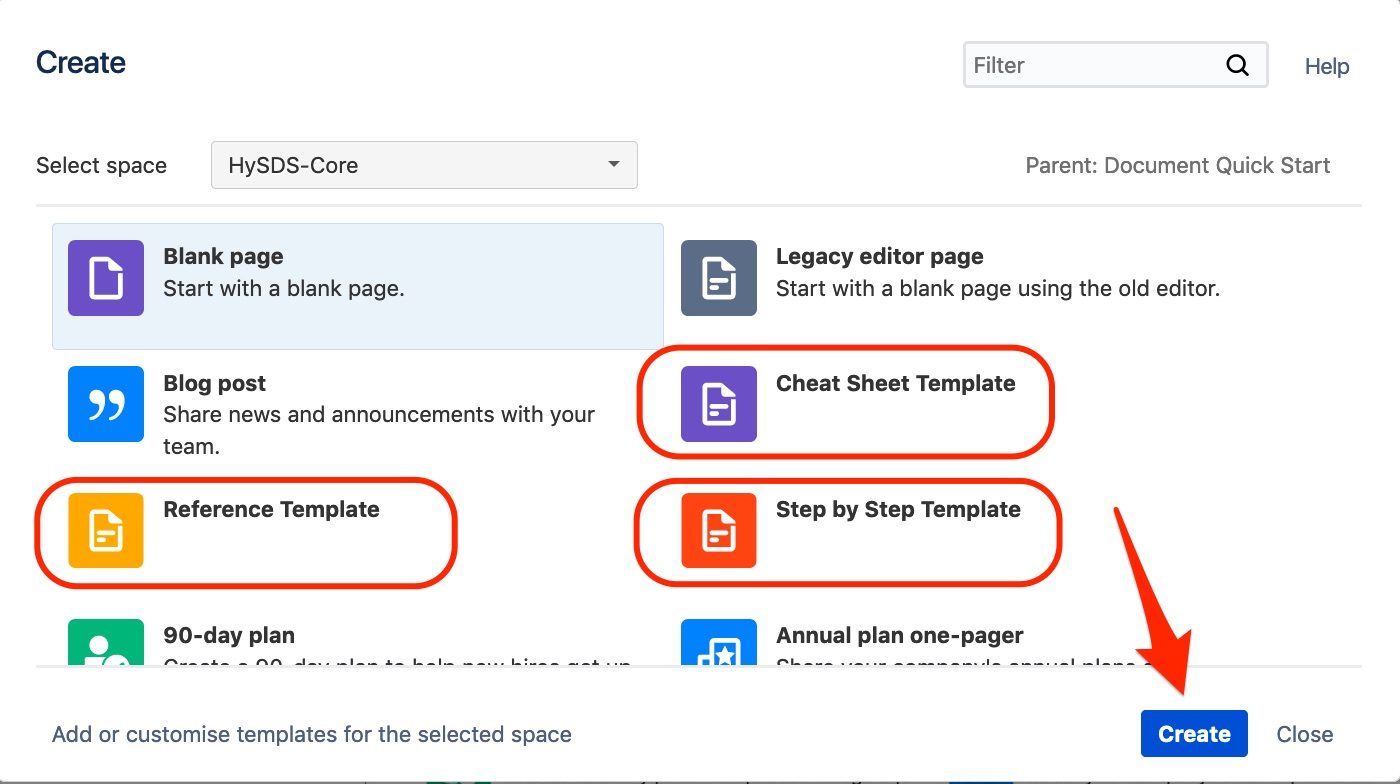
Step 2: Create a New Page (Tutorial, Step-by-Step Guides, Cheat Sheets)
In your new tab, navigate to the HySDS wiki and select the blue “Create” button in the top menu.

Step 3: Select a Template
| Info |
|---|
There are templates available for Tutorial, Step-by-Step Guides, and Cheat Sheets style documentation. For context or background related content, post in Stack Overflow Enterprise |
Use the template to structure your documentation, if additional page elements are needed follow the pattern outlined in the template.
Step 4: Include Written Content
For additional guidance on how to style your document’s content, see the Contribution Guide.
The template provides a minimal structure to assist with document development. Replace placeholder titles and descriptions as necessary. Be sure to keep your audience in mind while composing your documentation. Here is an excerpt from the style guide for reference:
Voice: | |
Tone | Documentation written for the public HySDS wiki uses a conversational tone, though not at the expense of utility or clarity. |
Audience | Wiki documentation can assume a baseline technical background of your audience. Foundational computing concepts normally covered in a four year university education do not need to be explained. However, specific use cases or adaptations of technologies may require some contextualization. Most HySDS wiki readers hold at least a bachelor’s degree in a technical field, and have 1-2 years of related work experience. |
Clarity | Avoid unnecessary technical jargon, excessive use of JPL specific acronyms, ambiguous terms, and buzzwords. Your writing should be clear and specific while maintaining a brisk pace. |
Sentences | When context or explanation is necessary, provide it using full and natural sentences. Do not present information in code-like fragments of text; utilize complete sentences and thoughts. |
Step 5: Include Images or Code
If your documentation includes screenshots or code snippets, include them at the appropriate place in the new page. See the points below for reference:
Elements: | |
Screenshots | Screenshots communicate valuable context to the user. If your documentation requires navigating a GUI at any point, screenshots will be an essential part of your documentation. All screenshots should be annotated for specific actions a user takes while proceeding. {be aware of screen load time and too many screenshots…hard to notice text between} {put them into expands!! this lets us see the high level overview} All IP addresses should be cropped our or digitally blurred. No images from JPL internal resources should be shared on the public wiki. |
Code | Code helps guide the user through critical steps in your documentation. All code should use TODO: how do you see command |
Diagrams | Diagrams are helpful in certain situations. They provide a visual map to quickly understand how various concepts interface. Not everything should be represented in a diagram however. If users have difficulty immediately understanding it, or have many follow-up questions, then the diagram probably isn’t suitable. |
Subject Matter Experts | SME’s are JPL employees deemed highly knowledgeable about each page’s subject matter. A page can only have one SME. They are responsible for error checking on that page and are a good resource for questions on the topics covered. Often, but not always, the original author of new documentation will be the SME for that page. (the one’s that designed the technology or did most of the work, but not necessarily the one to maintain the page) |
Labels | Page labels are another important navigation and usability feature of the HySDS wiki. Labels are used to populate the “Related Articles” box in each page’s footer. They are also used to identify documentation gaps, and perform wiki maintenance. It is your responsibility to properly label your documentation. More info on {Doc Start Here Page} |
Page Maintainers | Someone willing/able to check page to ensure its still current. Doesn’t necessarily need to be the most knowledgeable on the topic. |
Step 6 : Assign Labels
Labels are an important component of each page. They improve navigation and usability of the wiki. Every document has a combination of stateful and content-related variables.
Part 1: Open Label Window
In the upper right corner, click the “…”
Click “add labels”
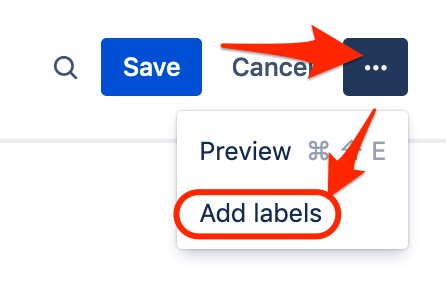
3. In the pop-up window, apply the appropriate labels from Part 2 and Part 3 below:
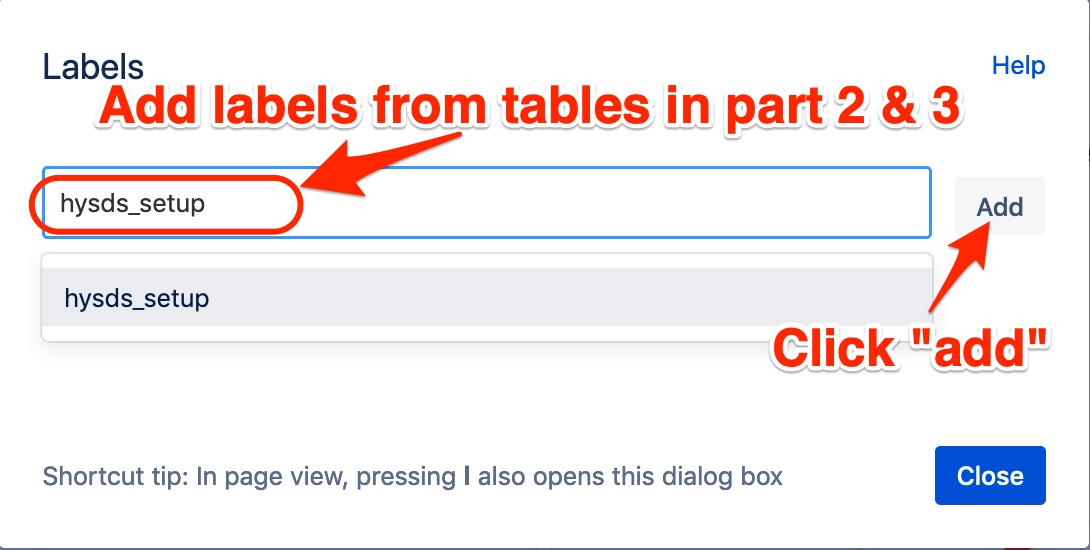
Part 2: Select Stateful Labels
Assign exactly one label from each column (3 total from the blue table):
Content Type: | Subject Matter Expert: | Page Maintainer: |
|---|---|---|
hysds_setup | needs_sme | needs_pm |
step_by_step_guides | sme_assigned | pm_assigned |
reference | update_sme | update_pm |
cheatsheets | ||
development |
Part 2: Select Content Labels
Apply any of the following labels that are applicable for your document:
Tech Labels: | HySDS Specific: | Content Variables: |
|---|---|---|
aws | tosca | hysds_setup |
linux | figaro | operations_manual |
python | mozart | diagram |
elasticsearch | factotum | onboarding |
kibana | verdi | troubleshooting |
logstash | grq | version_3.0 |
rabbitmq | job_management | Version_2.0 |
celery | tasks | version_1.0 |
supervisord | workers | wiki_development |
jenkins | sdswatch | |
docker | pge | |
github | provenance | |
terraform | metrics | |
sciflo | chimera | |
json | tasks | |
api | pleiades | |
| pcm | |
azure | ||
yaml |
Step 7: Customizing Page Footer Details
Each page template begins with a tri-box footer for page information and improved wiki navigation. Before publishing your new document update the footer following these steps:
Part 1: Update Green “Related Articles” Box
Click on the pencil “edit” icon at the bottom of the macro box.

This wiki macro is displays content according to the labels applied in Step 6.
Step 8: Update Page Confidence Indicator
The confidence indicator on each page reflects the accuracy of the page. This includes factors such as whether the page was formally reviewed by a subject matter expert, total page authors, and last update.
| Info |
|---|
Note: the confidence indicator should be placed immediately below the Table of Contents element, and above any page content. |
All templates are assigned a “TBD” confidence indicator by default in the templates. To apply a higher confidence interval, copy/paste from the below page elements to update new article.
|
|---|
|
|---|
|
|---|
Step 9: Assign SME & Page Maintainer
In the blue “Page Information” box, assign any potential SME’s using “@” + their name. There can be more than one SME per page.
Follow the same procedure to assign a page maintainer for the document. There should be only one per page.
Step 10: Publish
Once the page editing is finished, click “Publish” and move the page to the appropriate folder in the wiki.
That’s it!
|
Anyone can join our public Slack channelto learn more about HySDS. JPL employees can join #HySDS-Community
|
JPLers can also ask HySDS questions atStack Overflow Enterprise
|
| Live Search | ||
|---|---|---|
|
🚀 Page Information: | ||||||||
|---|---|---|---|---|---|---|---|---|
Was this page useful? | ||||||||
Contribution History:
| ||||||||
Subject Matter Expert: | ||||||||
Find an Error? Is this document outdated or inaccurate? Please contact the assigned Page Maintainer: |